Go Live & Crawling
Once you've connected your account and selected your content types, it's time to start the crawler and make your search page live.
Where to find it
On the Settings tab (/admin/config/search/opensolr), scroll down to the "Go Live" section. This section only appears after your index is connected.
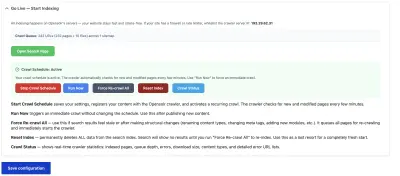
The crawler requires your site to be on HTTPS. If you're still on HTTP, you'll see a warning here. Set up SSL first, then come back.
Firewall whitelist
The Go Live section shows the crawler server IP address. If your site has a firewall, WAF, or rate limiter (like Cloudflare), you need to whitelist this IP so the crawler can access your pages without being blocked.
Need a web crawler server closer to your infrastructure? Contact us — we can deploy a dedicated crawler server in your region for optimal crawl speed and latency.
Starting the crawler
You have several buttons in this section:
▶ Start Crawl Schedule
Sets up a recurring crawl that checks for new and updated pages automatically. This is what you want for keeping your index fresh. The crawler runs every few minutes and only re-indexes pages that have changed.
▶ Run Now
Triggers a one-time crawl immediately without changing your schedule. Use this after publishing a batch of new content and you want it searchable right away.
◼ Stop Schedule
Stops the recurring crawl schedule. Your existing index stays intact — search still works, it just won't pick up new content changes.
What "Start Crawl Schedule" does
When you click this button, the module:
- Saves your current settings (content types, field mappings)
- Registers your
/opensolr-sitemap.xmlwith the Opensolr crawler - Sets up a recurring crawl schedule on the Opensolr servers
The crawler then visits your sitemap, discovers all your pages, and starts indexing them. Depending on the number of pages, the first crawl can take anywhere from a few seconds to several minutes.
Crawl status
Below the buttons, you'll see a "Crawl Status" button. Click it to open a real-time status dialog showing:
- Pages indexed — how many pages are in your search index
- Queue depth — how many URLs are waiting to be crawled
- Error count — pages that returned errors (404, 500, etc.)
- Content breakdown — how many HTML pages vs. documents were found
You can set the status to auto-refresh (every 5, 10, 15, 30, or 60 seconds) so you can watch the crawl progress in real time. Your auto-refresh preference is saved in your browser.
Force Re-crawl All
The orange "Force Re-crawl All" button moves every previously indexed URL back into the crawler's queue and starts a fresh crawl. Use this when:
- You've changed field mappings and need all pages re-indexed with the new meta tags
- You've renamed content types or restructured your site
- Search results feel stale or out of date
Force Re-crawl doesn't delete your index. Your existing search results stay available while the crawler updates them in the background.
Reset Index
The red "Reset Index" button is a last resort. It deletes all documents from your Solr index. After resetting:
- Search returns zero results until the crawler re-indexes everything
- You'll need to click "Force Re-crawl All" to rebuild the index
Reset Index deletes all search data. It requires a double confirmation. Only use this if you want to start completely from scratch.
Next step
Once your content is indexed, explore the Search Page documentation to understand what your visitors see.