Control Panel
Create a New Opensolr Index
From login to a fully configured, production-ready Solr index in under two minutes. Use the Control Panel or automate everything with the REST API.
LOGIN
Your account
→
ADD NEW
Dashboard menu
→
SELECT REGION
Version + location
→
NAME + CREATE
Click Add Index
→
CONFIGURE
Upload schema, go!
Five steps from zero to a fully operational Solr index
Step-by-Step Walkthrough
1
Log in to your Opensolr account
Head to opensolr.com/login and sign in with your email and password.

2
Open the Control Panel
Click your username in the top-right corner and select Control Panel from the dropdown menu.

3
Click "Add New"
Inside your Dashboard, open the My Indexes menu and click Add New to start creating a new index.

4
Choose your region and Solr version
Use the filter dropdowns to select a Region, Solr Version, and optionally a Country. Clusters are available across US-East, US-West, EU-Central, EU-West, EU-North, and Asia-Pacific.

Click the region card that matches your needs — or use Request Env. to request a custom dedicated environment.

5
Name your index and create it
Give your index a meaningful name or keep the auto-generated unique ID. Click Add Index and your index will be provisioned in seconds.

6
Open your Index Control Panel
Back on the My Indexes page, click your index name to enter its dedicated Control Panel — where you manage configuration, security, analytics, and more.

7

What You Get
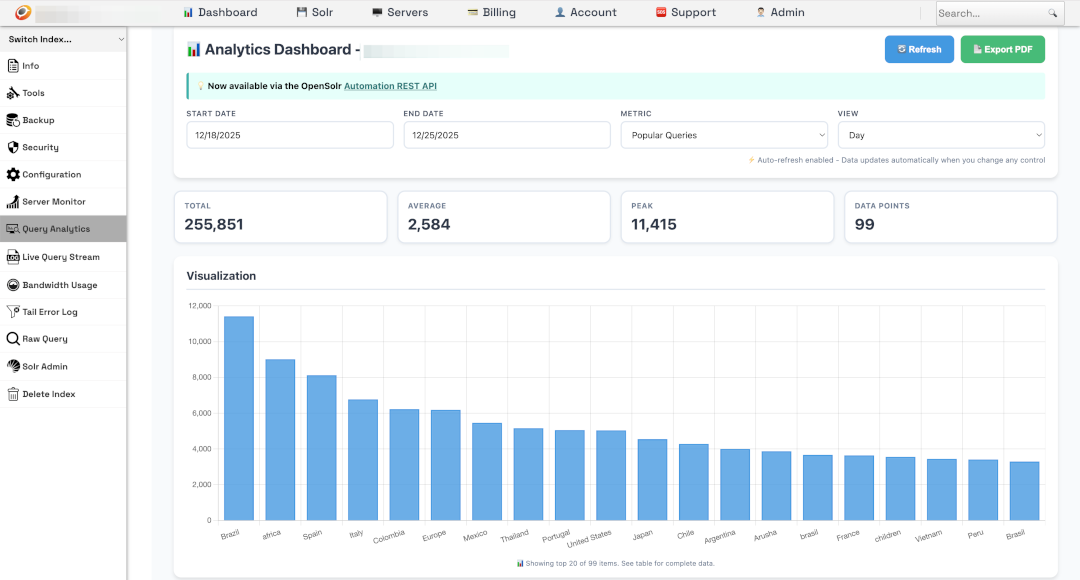
Real-Time Analytics
Query analytics, bandwidth stats, live query streams, and exportable PDF reports — all from your dashboard.
Security & Auth
HTTPS by default, HTTP Auth credentials, IP whitelisting, and per-index access control — managed from one panel.
Backup & Restore
One-click backups with instant restore. Automated replication across regions for maximum durability.
Live Config Editor
Edit schema.xml, solrconfig.xml, and all config files directly in the browser — or upload a zip archive.
REST API Automation
Automate index creation, config uploads, backups, and more via the Automation REST API.
Team Management
Invite team members, assign roles, and manage access across all your indexes from a single account.
Your Dashboard
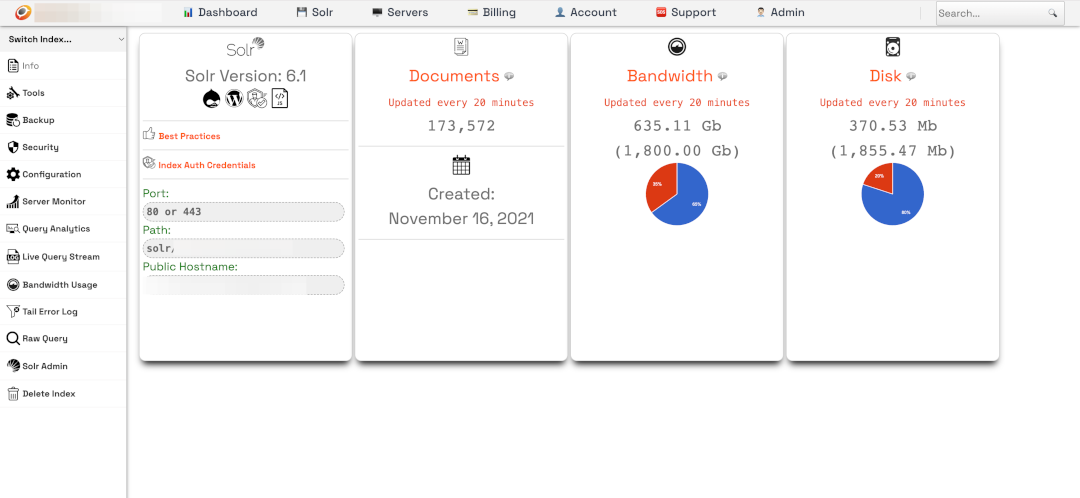
Once your index is live, the Control Panel gives you full visibility and control — query analytics with visualizations, document counts, disk and bandwidth usage, server monitoring, and direct Solr Admin access.
Ready to get started?
Create your first index in under two minutes — or talk to us about a custom setup.